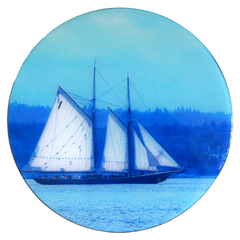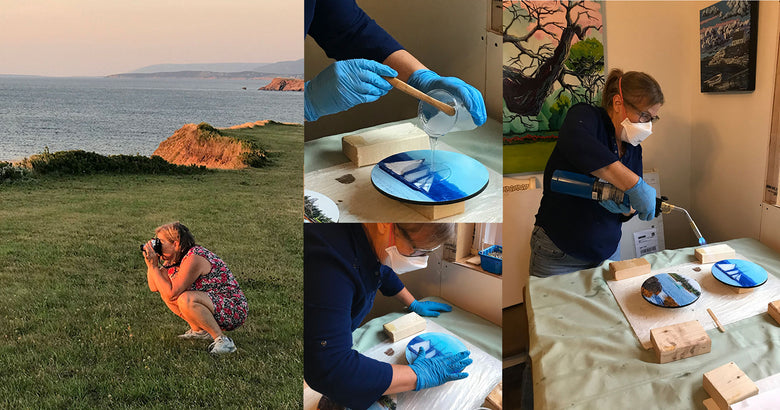
Taking photos. The search for a theme, with a particular angle, a luminosity that offers rich colors highlighting a subject chosen on the spot. The choice of support, shape and size. On wood, round, square, rectangular covered with resin. I print the photograph myself on high-quality paper and ink. Prints must dry flat for 24 hours. This waiting time allows the colors to set on the paper.
Wooden supports are handmade, occasionally purchased. I sand them, then apply 2 coats of paint and varnish to ensure good adhesion of the picture and resin.Once the picture has been glued to the wood, it will be weighted down and left for another 24 hours to ensure that it has adhered perfectly to the wood surface.
Levelling the wood substrate is important to ensure that the resin is even throughout.
Resin preparation must be meticulous to ensure a homogeneous mix with as few air bubbles as possible. Precautions such as gloves and mask are necessary.The resin is applied with a spatula, a wooden stick or fingers with glove, depending on the size of the substrate.
When the resin covers the print, bubbles form which either resolve themselves or have to be removed either with a small needle or a blowtorch. I use both methods. You also need to cover the supports to prevent dust from sticking to the resin. Once the resin has been applied, I keep an eye on it every 5-10 minutes from about 2 hours to make sure there are no new air bubbles or resin overflow. Then I have to let it dry for 24 hours without being able to touch it up again.
I place it in a safe area for a week, to give the resin time to harden and have the effect of glass without the inconvenience of breaking. I add the hooks and wire to suspend it in a new home.
And that's the process for resin photography.
À la prochaine
Gaétane